Best Budget-Friendly Fencing Solutions
for Beginners
Everything you need to know about affordable electric fencing — from polywire and netting to solar energizers — to protect your animals without breaking the bank.

Traditional wood, chain-link, and barbed wire solutions can cost thousands of dollars and require professional installation — not exactly beginner-friendly.
That's where electric fencing quietly changes the game. Whether you're protecting a flock of backyard chickens from foxes, keeping goats contained in a pasture, or managing a small horse paddock on a tight budget, electric fencing delivers dependable results at a fraction of the cost of conventional alternatives.
This complete guide walks you through everything a first-time farmer or livestock keeper needs to know in 2025: the different types of budget electric fencing, how to match each system to your animals, honest cost comparisons, and practical setup tips. By the end, you'll know exactly what to buy and how to get started — without overspending.
Why Electric Fencing Is the Smart Choice for Beginners
Electric fencing has become the go-to solution for modern homesteaders and small-scale livestock owners. Here's why it consistently beats traditional alternatives for anyone just starting out:
💸 Dramatically Lower Upfront Cost
A traditional 6-foot wooden privacy fence runs $15–$30 per linear foot installed by a professional. A comparable electric polywire setup? Less than $0.30 per foot. That's up to 100× cheaper — the difference between a $3,000 fencing project and a $90 weekend DIY task.
🔧 Zero Professional Installation Required
Electric fence systems are specifically designed for DIY installation. Most beginners have their first fence up and running in a single afternoon. You need posts, wire or netting, an energizer, and a ground rod — and that's genuinely it.
🔄 Portable and Flexible
Unlike permanent fencing, electric netting and polywire can be picked up, moved, and reconfigured in minutes. This is ideal for rotational grazing, seasonal paddock changes, or simply expanding your setup as your herd or flock grows.
🦊 Proven Effectiveness Against Predators
The mild electric pulse — harmless but deeply unpleasant — teaches animals to respect boundaries after just a few encounters. Once trained, livestock rarely test the fence again. For predator deterrence, the psychological barrier is as powerful as the physical one.
🛠️ Minimal Ongoing Maintenance
No rotting wood. No rust. No broken boards or snapped wires to replace. With solar-powered energizers, you can even set it up in a remote paddock and go weeks without touching it.
The 3 Essential Components of Every Budget Electric Fence
Before comparing products, every beginner should understand the three-part anatomy of an electric fence system. Regardless of what animals you have or how large your property is, these three elements are always present:
The Wire or Netting — The Barrier
The physical element that animals see, approach, and occasionally touch. It conducts the electrical pulse along the fence line. Your choice between polywire and electric netting depends on your animal type and setup size.
The Energizer (Fence Charger / Pulser) — The Power Source
The device that generates the electric pulse. Runs on AC mains power, DC battery, or solar energy. This is the most critical component to choose correctly — underpowering your fence is the most common beginner mistake.
The Ground Rod — Completing the Circuit
A metal rod driven into the earth that completes the electrical circuit when an animal touches the fence. Typically 6–8 feet of galvanized rod. Usually included with starter kits or costs under $15 separately.
Your main decision as a beginner is choosing between electric polywire/wire and electric netting, then matching an appropriately-sized energizer to your total fence length. The sections below cover each in detail.
Budget Fencing Types at a Glance
Here's a quick comparison of the main electric fencing options available to beginners — including how they compare against traditional alternatives on cost and ease of use:
| Fencing Type | Best For | Avg. Cost / 100ft | Setup Difficulty | Portable? |
|---|---|---|---|---|
| Traditional Wood Fence | Privacy, permanent perimeters | $250–$400 (installed) | Hard (professional) | ❌ No |
| Chain Link Fence | Dogs, general containment | $150–$250 | Medium | ❌ No |
| Barbed Wire | Large cattle perimeters | $30–$60 | Medium | ⚠️ Limited |
| ⚡ Electric Polywire | Horses, cattle, temporary divisions | $15–$30 | Easy ✓ | ✓ Yes |
| ⚡ Electric Netting | Poultry, small livestock, gardens | $40–$80 | Easy ✓ | ✓ Yes |
Cost Comparison: Electric vs. Traditional Fencing
The chart below illustrates the average cost-per-100-feet setup investment for common fencing types. Electric options from VetraPulse represent a fraction of traditional costs — making them the clear winner for budget-conscious beginners.
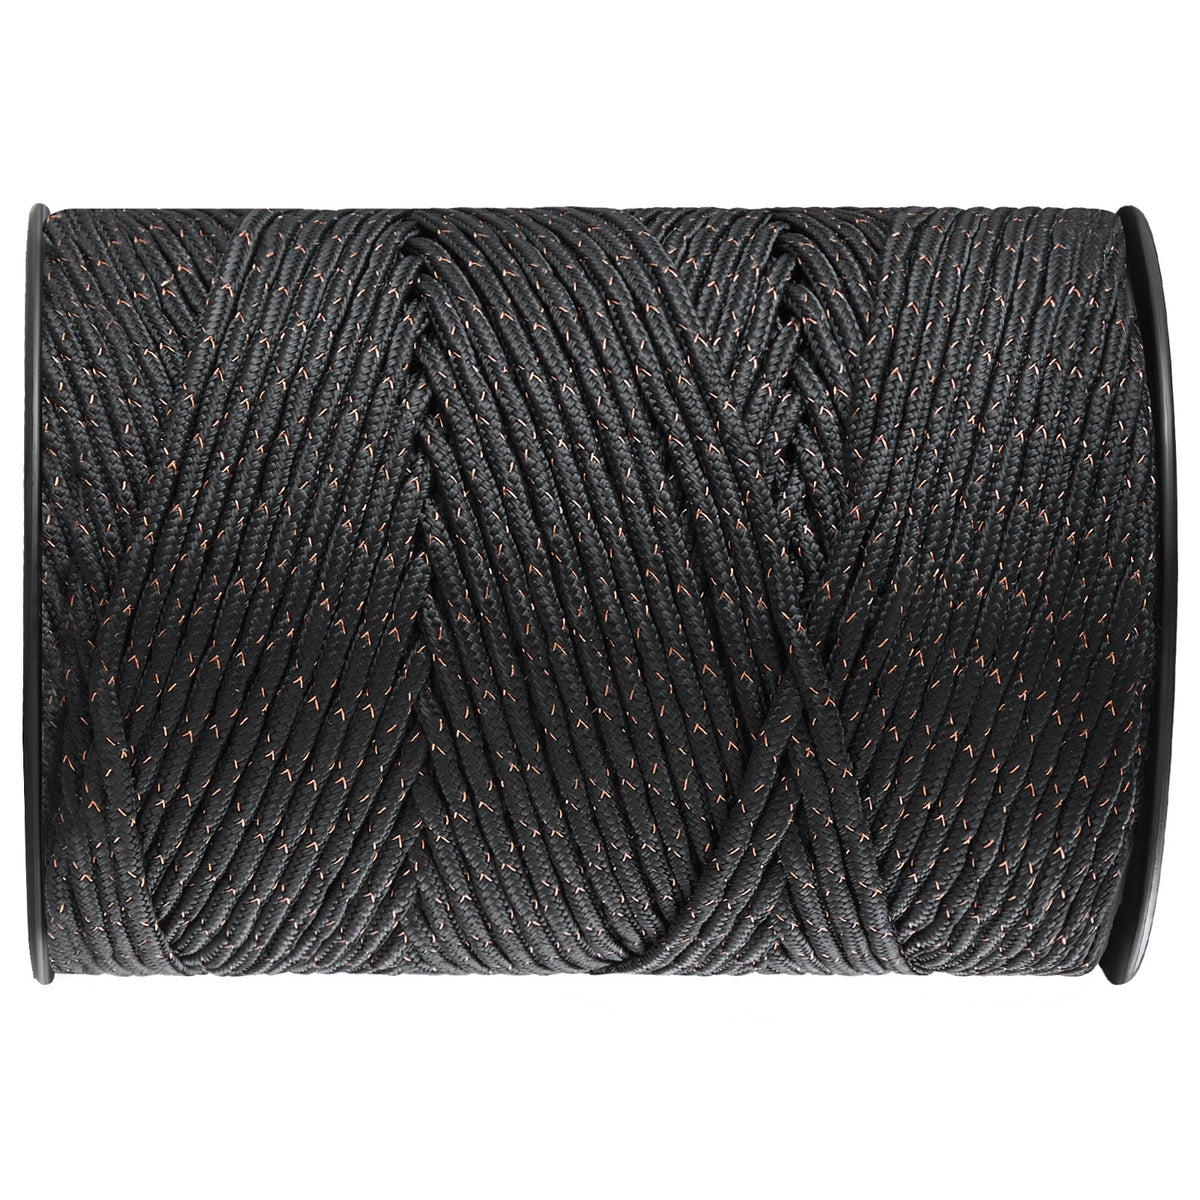
Electric Fence Wire & Polywire — Most Affordable Option
Electric polywire is the most cost-effective electric fencing available, making it the perfect entry point for beginners managing horses, cattle, or large-area temporary divisions.
What Is Electric Polywire?
Polywire combines polyethylene plastic fibers with conductive metal strands — typically copper or stainless steel. The result is a flexible, lightweight wire that's highly visible in the field, safe to handle compared to barbed wire, and reliably conductive over long distances. It comes on a reel and installs in minutes on standard T-posts with simple clip-on insulators.
Best Use Cases for Polywire
- Horses and ponies (highly visible, strong deterrent)
- Cattle and beef herds (large perimeters at minimal cost)
- Temporary paddock subdivisions for rotational grazing
- Cross-fencing within an existing permanent perimeter
- Seasonal or event-based livestock containment

Electric Netting — Best Protection for Poultry & Small Animals
If you keep chickens, ducks, geese, rabbits, or goats, electric netting is arguably the single most effective fencing investment you can make. It protects from the top down, the sides, and near the ground — a complete barrier no single wire can match.
How Electric Netting Works
Electric netting is a mesh fence where multiple horizontal strands are energized and vertical strands provide structural integrity. Unlike a single polywire strand (which a determined fox can duck under), the netting's grid ensures that any predator attempting to push through, dig under, or climb over makes contact with an electrified strand. It's a physical and psychological barrier in one. 🦊
Why It Outperforms Wire for Small Animals
Small animals like chickens are too short and light to reliably contact a single elevated polywire. Netting works from ground level up, which means even a small pullet or rabbit is fully contained. Predators that approach low to the ground — as most do — make contact with the lowest electrified strands immediately.


Key Features to Look for in Electric Netting
| Feature | Why It Matters | VetraPulse Rating |
|---|---|---|
| Height (42"–48") | Taller fences deter jumping; 48" is ideal for most poultry | ✓ Excellent |
| Mesh Spacing | Tighter near the base prevents small predators squeezing through | ✓ Optimized |
| Built-in Fiberglass Posts | No separate post hardware required; stakes into soil easily | ✓ Included |
| Double-Spiked Ground Stakes | Prevents base of fence lifting — key for predator blocking | ✓ Included |
| Quick-Connect Lead Out Wire | Makes connecting to energizer simple and tool-free | ✓ Included |
Fence Energizers (Pulsers) — The Brain of Your System
Your electric fence is only as effective as its energizer. Choosing the right one is the most important decision a beginner will make. Too weak, and animals push through; too powerful, and you're wasting money on capacity you don't need.
Understanding Joules — The Only Spec That Really Matters
The joule (J) rating tells you how much energy the energizer delivers per pulse. More joules means more effective deterrence through longer fence lines and heavier vegetation contact. As a beginner, here's the simple rule:
| Setup Size | Recommended Output | Ideal For | VetraPulse Option |
|---|---|---|---|
| Backyard / Small plot | 0.3J – 1J | Up to 1.86 miles of fence | 0.3J Solar Charger |
| Small farm (1–5 acres) | 1J – 3J | Mixed livestock, multiple paddocks | 2J Multi-Power Charger |
| Medium farm (5–10+ acres) | 3J – 5J | Cattle, large perimeters, wild predators | 5J Multi-Power Charger |
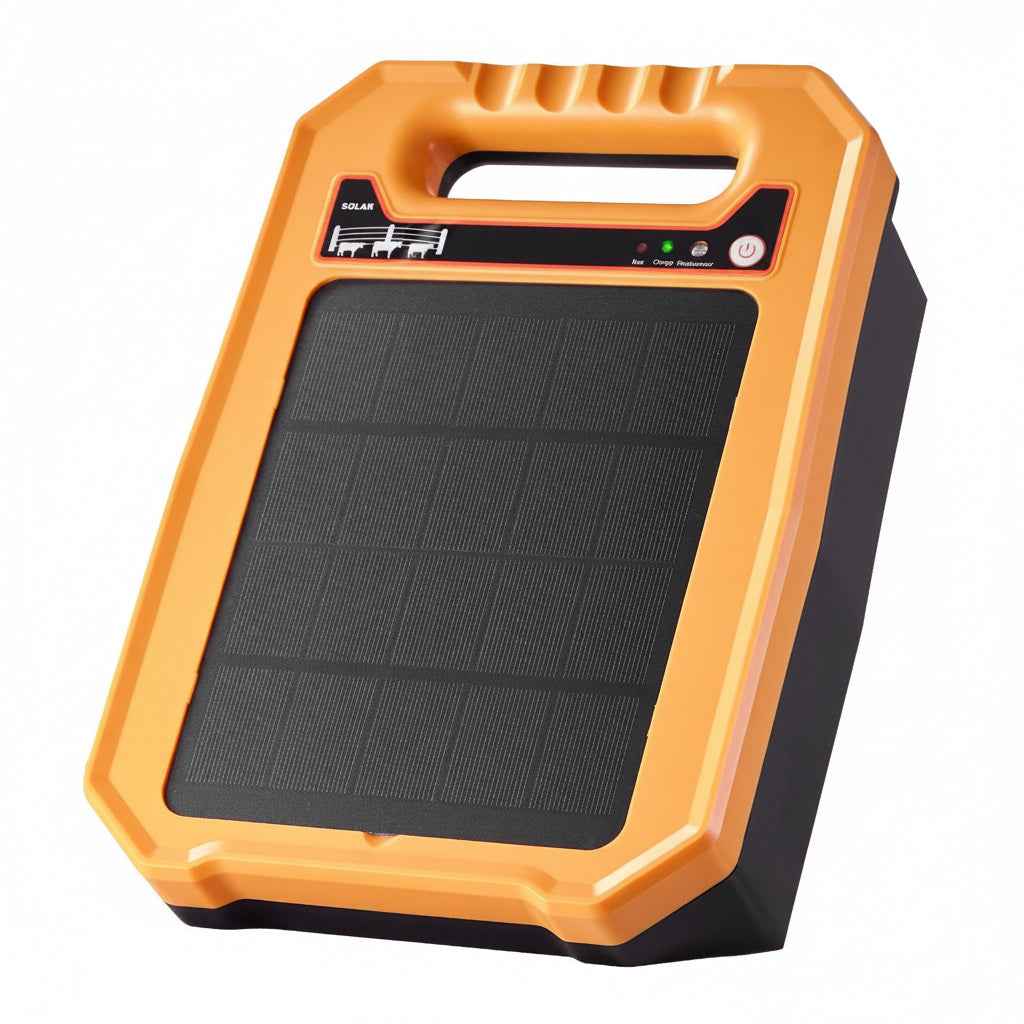

Solar vs. AC/DC Energizer — Which Should You Choose?
| Factor | ☀️ Solar Energizer | ⚡ AC/DC Energizer |
|---|---|---|
| Power Source | Sunlight (built-in panel + battery) | Mains electricity or 12V battery |
| Best For | Remote pastures, no outlet nearby | Near barns or buildings with power |
| Ongoing Energy Cost | $0 | Very low (~$5–$10/year) |
| Reliability | Reduces slightly on cloudy days | Consistent regardless of weather |
| Portability | Excellent — fully self-contained | Tethered to power source |
| Beginner Pick? | ✓ Small/backyard setups | ✓ Reliable power / larger farms |
Which Fencing Solution Is Right for Your Animals?
Use this reference table to quickly match your livestock type to the most effective and budget-friendly fencing combination:
| Animal Type | Recommended Fencing | Recommended Energizer | Key Reason |
|---|---|---|---|
| 🐓 Chickens / Poultry | Electric Netting 48" | 0.3J Solar | 360° ground-to-top barrier; predator-proof |
| 🦆 Ducks / Geese | Electric Netting 48" | 0.3J Solar | Low-profile animals need near-ground protection |
| 🐰 Rabbits | Electric Netting 42" | 0.3J Solar | Fine mesh prevents escapes and predator entry |
| 🐐 Goats / Sheep | Electric Netting 42" or Polywire | 0.3J–1J | Goats test fences — electric netting deters effectively |
| 🐴 Horses / Ponies | Polywire (2–3 strands) | 0.3J–1J | Highly visible wire; horses respect the boundary quickly |
| 🐄 Cattle | Polywire (1–2 strands) | 2J–5J Multi-Power | Large perimeters; higher output overcomes thick hides |
| 🌱 Garden / Crops | Electric Netting or Polywire | 0.3J Solar | Deters deer, rabbits, and ground predators |
How Beginners Are Using Electric Fencing in 2025
Based on usage patterns from small-farm communities, here's a breakdown of how first-time electric fence buyers are applying these solutions — and the proportional importance of each use case:
Real Beginner Experience — Sarah's Story 🐔
Real stories from first-time users often say more than any spec sheet. Here's how one backyard farmer made the switch to electric netting — and never looked back.
I ended up going with the VetraPulse 48" poultry netting and the solar energizer. Total investment was under $90. Setup took me about 45 minutes on my own — no special tools, no professional help. That was eight months ago. I haven't lost a single bird since.
What surprised me most was how quickly the chickens learned to respect the fence. After the first few days, they just... avoided it naturally. The solar charger has been completely maintenance-free. I check the voltage every few weeks out of habit, but it has never needed attention."
Sarah's experience reflects a pattern seen across hundreds of beginner homesteaders: those who invest in quality electric fencing early avoid costly losses and expensive fixes down the road. The combination of a complete netting kit and a solar energizer is consistently the fastest path from "first-time farmer" to "confident livestock keeper."
How to Get Started — 3 Steps for Beginners
Setting up your first electric fence system doesn't require any prior experience. Follow these three steps and you'll have a working, effective fence on day one:
Choose Your Fencing Type Based on Your Animals
Use the animal guide table above. Poultry, rabbits, or small livestock? → Electric netting. Horses, cattle, or large perimeter? → Electric polywire. When in doubt, netting offers the most complete protection for backyard setups.
Match Your Energizer to Your Total Fence Length
Measure your planned fence perimeter, then select an energizer rated for at least 2× your total length — this accounts for vegetation, multiple fence lines, and system losses. For most beginners, the 0.3J Solar Charger (1.86mi range) handles backyard-to-small-farm setups perfectly. For growing operations, the 2J–5J Multi-Power Charger grows with you.
Install, Ground, and Test
Drive in your ground rod (at least 6 feet deep), connect your energizer, unroll your netting or polywire, and use an inexpensive fence tester to verify voltage. VetraPulse netting includes all posts and stakes — no additional hardware needed for most setups. Check tension, ensure no vegetation is grounding the line, and you're live.
Frequently Asked Questions
Common questions from beginners setting up their first electric fence system. Click any question to expand the answer.
How do I know what joule (J) rating I need for my setup?
Is electric fencing safe for children and pets around the property?
Can I use electric netting during winter or in frozen ground conditions?
Do I really need a grounding rod, and how deep should it go?
What's the difference between electric polywire and polytape?
How long does electric netting typically last?
Can one energizer power multiple fence lines at the same time?
What happens if vegetation grows up and touches the fence wire?
Start Protecting Your Animals Today 🌿
Electric fencing gives every beginner the confidence to protect their animals and property from day one — at a fraction of traditional costs. VetraPulse is built for real farms, without the professional-installer price tag.
Explore VetraPulse →